One of my favorite things to do while watching TV is crocheting. I haven't been crocheting for long. Just over a year or so. I learned the basics when I was a younger and then forgot about it.
I have a friend that crochets so I asked her if she would teach me. I went over, sat down and we began. I already knew how to hold the hook so she basically showed me a couple stitches and I went on my merry way.
I quickly realized one thing. I am awful at doing squares. I've tried. I've made a friend a baby blanket which was by no means straight around the edges, even though I started over a few times.
But then I found my place in the crocheting world. Hats. I am really good at doing things that don't need a straight edge. I found I can crochet in a round like nobody's business. My first hats I made I gave to my boys. One got a blue angry bird and the other a red. I'm kind of embarrassed about them now and have debated making them new ones. The problem with that? I keep getting hat orders for these little guys.
Don't get me wrong, I'm very grateful that people enjoy my work and I'm happy to use my talent to make people happy. (So if you'd like a hat, feel free to let me know) Plus, how cute are these?
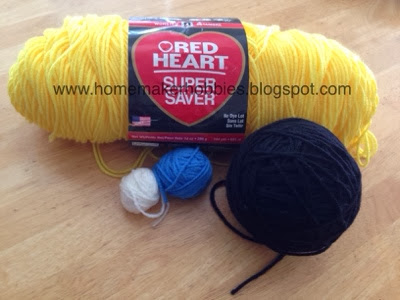
First, make sure you have the yarn colors you want. For these you would need a bright yellow, black, white, grey and whatever color you want for the bottom. I like using red heart super saver yarn, but whatever you prefer, I'm sure will be fine. Just be careful if you are using a thin yarn. They stretch out faster.
The pattern I use for most of my hats, I found
here. They add in an extra row I don't use (round 6). I also usually use a double crochet instead of a half double.
When I size the hats, I use my kids for sizes. I have measured their head with a piece of yarn, so when I'm checking to see if the hat is the right size, I lay out the circle and put the yarn around the outside of it to see if it would fit. Remember, always go bigger rather than smaller. Kids will grow before they shrink.
For the kids hats I do 10 rounds of yellow for the top. For adults I do 11.
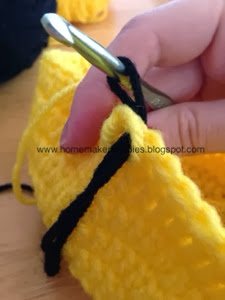
Changing colors can be tricky. I don't have any awesome trick to use when changing. When I get to the point you need to do a round or two in a different color, I slip stitch color A closed. Take your hook and place it through where your next stitch would go.
I take the loop of color A and slide my hook through that as well.
Take color B and pull it through. Make sure you leave a tail.
Chain 2 with color B, which can be easier said than done.
Do your double that goes next to the chain and then pull color A tight.
I like to take the tail from color B and before I do the yarn over to pull through the stitch, I twist it once with the yarn I'm using. This helps hold the tail in tight so it won't come out. I'm sure you could probably do it a different way as well, but that's how I do it.
Add 3 more rows of yellow. 4 for an adult.
2 rows of your bottom color. If you don't want the ear flaps and braids, you can add a single crochet round here to finish off your hat. If you want them, please continue. (Don't forget to weave in your yarn ends.)
For the ear flaps, I chain 13 and then double crochet in each one starting in the third one from the hook. This will give you 11 stitches. When you get to the end, chain 2 and flip. Then double crochet two together, double crochet in the next 7 then double crochet the last two together. Chain 2 and flip. Continue the pattern until you have 3 stitches left and tie it off. Make 2 of these. If you're making it for an adult, I add 2 more to the chain so it's a little bigger.
When I sew the flaps on, I close the hat so the seam is on one fold. Put the ear flap in the middle, chain side up and sew it on using whatever color yarn that part of your hat is.
Flip the hat and sew the other one on the other side.
Once both of the ear flaps are on, I single crochet all the way around to help hold the ear flaps on as well as giving it a little better finish.
For the eyes, I use the same pattern I use for the top of the hat. I do a round of black, two rounds of white and then a grey single crochet around for round 4. Leave a nice long tail when finishing it off.
Now have a little fun with the eyes. What good is a hobby, if you don't have fun with it?
Open your hat with the ear flaps on both sides and center your eye(s) however you like. Use the tail to sew the eye to the hat.

The braid is pretty simple. Decide how long you want the braids. Add a little extra. Now add a little more. When you braid, it will get shorter, plus it takes some yarn when you tie it on. You also need a little extra to be able to trim the ends after. I find something that is about the size I want the yarn and wrap it around. I always make 12 yellow and 24 of the matching color. Each piece of yarn is going to be folded in half, so when it's open, it should be twice as long as you need it. (Hi Jessie!)
Sort your yarn. You can try mixing it up a bit. So the braid has both colors throughout.
Now fold the yarn in half and put your finger through the loop so the yarn is draped over your finger.
Put your crochet hook through the middle space on the last row of double crochet on the ear flap.
Carefully pull the yarn through. I like to pull it from the outside of the hat to inside so when you loop the ends through, the loop is on the inside.
Put your fingers through the loop and pull the ends of the yarn back through.
Carefully tighten it down. Be careful not to stretch out your hat.
Braid the yarn and use a piece of yarn to tie the end off.
I always line up my braids so they are the same length. After you tie them off, check to find a shorter piece of yarn and use that as a guide of where to trim the ends so they match.
And now you have a super cute minion hat for your little minions!
If there is anything you would like to see on my blog, a game to play, a recipe, a pattern, feel free to leave me a comment and I will see what I can do.
If you would like to order a hat like this one or another crochet item, feel free to leave a comment below, contact me on
Twitter, or order through my
Facebook page.






 . I have to say, I kinda love this game! The instruction booklet starts out like a comic. There is a panda given to the Japanese from the Chinese to show their appreciation of a kind welcome and to help seal an alliance.


