Showing posts with label Kids. Show all posts

Monday, June 16, 2014

Melted Crayon Art

   A week or so ago, I decided I wanted to try out some melted crayon art. I don't own a hair dryer to do the one that drips down so I was trying to find a different way. I found a post on Pinterest about shredding a crayon and using an iron to melt it. I didn't really like the way it turned out. I looked into it more and found out they were ironing it like you would clothes, but if you held the iron still, it wouldn't make it a big mess of mixed crayon. I decided to give it a try. I had read that they used a cheese grater to shred the crayon. All I accomplished by trying it that way was coloring on my cheese grater. I grabbed a sharp knife and carefully got to work.

This is about two crayons each. You may need a couple boxes depending on what you are making.


   I grabbed a piece of card stock, hoping it would hold up better than regular paper.


   I decided I wanted to try out a Batman logo. I printed one off of the internet and carefully cut it out.


   I figured it would be easiest to start on the inside and work your way out. I placed the cut out logo on the paper.


   Carefully fill it in. One nice thing about doing it this way is you can gently push the crayon that landed on the template into the middle to help keep it nice and clean.


   Carefully lift the paper and touch up the outline.


   Next, I used the piece I had cut out to cover the black crayon to help keep the yellow from mixing in. I just shaped this on my own. It wasn't too hard since it's an oval.


   I thought it might look cool to add the mixture of the two colors around the outside.


   Very carefully remove the paper from the logo. I did end up getting a couple bits of yellow mixed in with my black. I used a toothpick to very carefully pick out the yellow.


   Tape down some wax paper over the top of your art work. Put your iron on the lowest setting and very carefully melt the crayon.

  
   Here is my finished work. Not bad for a first time, but can still use a little bit of improvement.


   Some tips that might help:

   Make sure your crayon is the same thickness throughout the work. The middle was much thicker than the outside. This made it so it wouldn't melt evenly.

   It doesn't look cool to add a mixture of the two colors around the outside. It would have looked a lot better if that mess around the edge was just yellow. It would actually look pretty cool.

    Hold the iron flat and don't move it around. Don't even put it on the paper. Just hold it above the paper. It gets plenty hot to do it that way.

   When you are letting it cool, place something over it or on the edges of the paper. It will curl and if you try and flatten it back out, the crayon will crack. I had mine curl so I placed it on a cookie sheet out in the sun. It melted back down again pretty quick. This might also be a good way to melt it without an iron. Just make sure you watch it, once it starts melting, it goes fast!

   Other than that, have fun with it! If you are doing it with children, make sure you watch them closely. I recommend not letting them shred the crayon or use the iron unless they are old enough to do it safely. When I was looking at different ways to do this project, I saw one where they let their kids use a pencil sharpener to help get the crayons ready. This might be a good alternative.

   If you give this craft a try, I would love to see what you come up with as well! I'm already trying to decide what I want to do next.

   Happy crafting!

Friday, April 11, 2014

King of Tokyo Review

   Who wouldn't want to be the King of Tokyo? Okay, I technically wouldn't want to, but in a game, definitely!


    Here's the inside of the box. Everything fits rather nicely.


   The game play and rules are simple. Pick your monster and its matching monster board. There are many fun monsters you can choose from.


   Set the points on your monster board to 0 and life to 10


   Place the board between you.


   Make a pile of your energy cubes. You use these to buy power up cards.


   These are the cards that you will use your energy cubes on. The amount of cubes is in the top left corner. The description of what it does is on the bottom. The artwork on the cards is pretty amazing! Shuffle these cards and place the first three on the side of the board, face up. Those are the ones you can choose from. Once a player buys a card, take the top card off of the deck and place it where the other one was.


   Some of the cards make it so you can do things such as poison a person. There are tokens for those powers to help you keep track.


   There are six dice. There is a lightning bolt that gives you an energy cube. A heart that heals. The paw is an attack. There are numbers one through three. If you get three of the same number, you get points. Three ones are worth one point. Three twos are worth two points. Three threes are worth three points. After you have your three of the same number, if you roll an additional one, it scores one more point. There are two green dice. There are cards that give you extra dice to roll. Only the person that has that card can use the extra dice.


   Your game is now set up and ready to go!


   The first player rolls all six dice. You can re-roll any of the dice you like. You can re-roll twice. The first person that gets an attack is put into Tokyo City. Place your monster on the Tokyo City circle on the board.


Here are the rules:
- You can not heal while in Tokyo City.
- If you are attacked, you take one damage per attack rolled.
- When you are attacked, you can take your damage and decide to leave Tokyo City.
- When you leave Tokyo, whoever attacked you must go into Tokyo City.
- If you are in Tokyo and you roll attacks, you attack every player that is not in Tokyo.
- You get one point when you go into Tokyo City.
- If you are still in Tokyo City when it comes around to your turn again, you get two points.
- If you are playing with five or six people, you use the Tokyo Bay circle as well.
- Tokyo Bay is used the same as Tokyo City.
- Once you get down to four people, you no longer use the Tokyo Bay space.

Keep going until you have a King of Tokyo. You become the King by either getting to 20 points first or when everyone else dies.

I really really enjoy this game. It's a fun family game that only takes about half an hour. Our boys love to play this game. It has a lot of luck and not much strategy. If you are looking for a game for the whole family, this is one I would highly recommend!


Tuesday, March 4, 2014

#DisneySide @Home Celebration

  *I received free products in order to host the Disney Side @Home Celebrations. The opinions expressed here are my own.

   A few months ago, I got an email asking me if I would like to host a Disney Side @Home Celebration. I of course was more than happy, seeing as how I LOVE Disney!

   I signed up and waited to see if I was picked. A while later I got an email saying I had been picked and my package should arrive within the next month or two. I was beyond excited! My oldest was turning 9 during the time frame we had to host the party. What a perfect way to throw a party! Most of the supplies would be coming in my pack.

   I checked the tracking on my package daily. I was watching it travel across the US at what seemed to be the pace of a turtle. It seemed like it was taking forever to get here! I was getting more and more excited to see what was going to be in my special Disney package. I was just positive it would be full of magic!

  The day finally arrived and my package came! I promised the hubby that we wouldn't open it without him here. It sat on my floor for what seemed like hours! I had already waited weeks for it. Surely another couple hours wouldn't hurt, right?


   He FINALLY got home and we gathered around to open it. Here's what we found inside:


   I was so excited! There were plates, napkins, cups, table cloth, decorations, cookie cutters, Bingo, bracelets, an IPhone 5 case... all of it Disney. There were also measuring cups and recipe cards from ABC's the Chew, Photo paper from HP and much more. It all came in a nice suitcase by American Tourister.

  The day of the party came. We decorated with all of the many things Disney. We made Disney shaped Rice Crispy Treats with the cookie cutters. Hung the decorations up and waited for our friends to come.


   We pulled out all of the Disney games we have. The older kids played some Disney Trivial Pursuit. The younger ones played with our Monsters University Dice game. When we had enough of those games (Trivial Pursuit goes on for FOREVER when you are playing with 5 kids, the oldest being 9) we gathered the kids all together and played some Bingo.

  We found some cute little Disney coloring activity packs at Target and used those for prizes for winning at Bingo.


   Overall, it was a good party. Great products from the many sponsors involved. We all had a great time! We used many of the smaller things such as the bracelets and HP photo paper as party favors. I hope I will be able to host another one of these parties in the future! It made planning a birthday party so much easier. I can't wait to go on a trip and try out my new suitcase as well, maybe a trip to Disneyland is in order??

Wednesday, January 22, 2014

Hey, that's my fish! Review

   Hey That's My Fish is another fun little game. It's great for a time filler as it plays rather quickly. We have played this while waiting for everyone to show up for our game nights. The idea behind it is to get more fish than everyone else.


   It's a rather small sized box, so it doesn't take up much room. The tiles are small as well so you won't need a huge game playing surface for it.


   To set it up, you lay out the tiles. You alternate between rows of 7 and 8 so they make a square.


   Pick a color of penguin you would like to be. There are four colors. Each color has four poses. I think these little guys are awesome. They are wearing bibs and running off with fish.


   You start off by taking turns placing your penguins. For a two player game, you use all four of your penguins. For a three player, you use three penguins and for a four player you use two. This game has some strategy to it. You can move your penguin in a straight line until it hits another penguin or comes to a hole in the board, like if they were sliding across ice.


   When your penguin moves, you take the tile that was under it while singing "So long and thanks for all the fish!" (You don't really have to, it's just fun) Those fish are your points. There are 1-3 fish on each piece.


   You need to be careful, as your pieces can get stuck between two others, like the green one at the bottom. When this happens you end up with a penguin just sitting there unable to get you any more fish.


   When there is a tile that can no longer be reached, its removed off of the board and isn't scored at the end.


   When there's an island, the piece on it gets all of the pieces it can get to while going in straight lines so make sure you plan it out.


   Sometimes there is a tile or two that you can't get to on an island. The piece(s) left would be removed from play.


   After all the tiles are taken, you add up your fish. In this case, yellow got 51 fish, green got 48 fish and there was one we couldn't score. Yellow won! (because I was green)


   We were watching a review of this game on YouTube (sorry, I can't remember which one) when they were talking about how sometimes it's hard to get the tiles out because they are so small and all lined up. They had a suggestion about a way to get the tile out easier. It's a super special tool.


   You can use a Nerf dart with a suction cup on the end. It works pretty well at getting the pieces out without messing up the rest of the board.


   This is a fun game. I enjoy playing it and we have played it with our older boys. I say older but they are almost 9 and 7, so it's pretty easy to understand. I think this game is a great one to help children learn good sportsmanship while playing games. Things don't always go as planned and it can keep you on your toes a bit. You're trying to get the most fish while making sure you don't get blocked out and maybe trying to block out someone else while you do it. It makes kids plan a strategy that is going to be constantly messed up so they have to use problem solving skills as well. I like playing games with my kids that make them have to use their brains.  


Saturday, January 18, 2014

We're not gonna lose, because we have everything we need to win right here. -Mike

   My youngest loves to play video games. I mean LOVES. He's only 3 but can work his way through a game on the Wii. He's not great at it, and playing it with him is pure torture! His older brothers try, but it usually ends up with them all frustrated and telling me that they are "never playing anything with him ever again!" That usually lasts about 5 minutes before they are in there trying again.

   Every morning after we drop the older two off at school, I ask him "What do you want to do today?" About 95% of the time he says he wants to play the Wii. Sometimes I let him. Probably more than I should. Depending on what I need to get done for the day, sometimes that is the only way I can get anything accomplished. Having 3 young boys, I have to get something done every day, or else my  house becomes a danger zone and looks like a tornado came through.

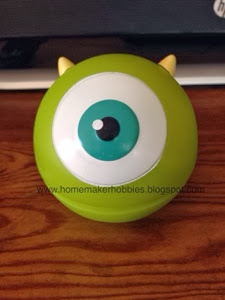
   Some days I don't feel like doing anything. I can usually get my lil one to play a game with me because who doesn't want mom's undivided attention? One of his favorite games is this Monsters University - Dice Game


   I don't know about you, but my kids LOVE Monster's Inc. When we were out trying to find something for my middle one to buy with his birthday money, we found this little game. It's really simple. I guess it's the same as 'Left, Center, Right'. I haven't ever played that one, but I have played this one many times. It's a super fast game if there's only 2 people. Sometimes only taking less than 5 minutes.

   All that is in the game are little tokens with Monster's characters on them and three dice.


   Each player takes 3 tokens. Put the rest in a pile in the middle.


   On your turn, you roll the dice. One of three things will show up. A purple dot that means you keep a token. A finger that points either left or right, that means you pass a token in that direction. If the green eye pops up, you put a token in the middle. Each token has one die for it, up to three. So if you only have two tokens left, you only roll two dice. If you have 3 or more tokens, you just roll the three.


   Whoever ends up with everyone else's tokens wins the game.

   I love how you can open his mouth and you can fit all of the pieces in there. I guess it's also to help little hands shake the dice. We have found that it's easier just to grab a cup if they need help. You have to help them squeeze the mouth open anyway.

   This game is easy enough that my little man can play it mostly by himself. It's nice to throw in between the never ending Hi Ho Cherry-O and Candyland.

   Whenever I have someone ask me if I have any games that would be good for kids, I always tell them about this one. It's a game that all of my kids like to play and they can even play it with each other if mom and dad are busy. It's a good game for teaching kids how to take turns. It's a pretty fast moving game, depending how much shaking of the dice is done before your kid rolls it. It's easy enough that preschoolers can play it with little to no help if they are able to follow directions. My older two can even explain it to their friends and cousins and teach them how to play. I highly recommend this game if you are looking for a game for your children.

   What are some games you like to play with your kids?