Saturday, January 18, 2014

We're not gonna lose, because we have everything we need to win right here. -Mike

   My youngest loves to play video games. I mean LOVES. He's only 3 but can work his way through a game on the Wii. He's not great at it, and playing it with him is pure torture! His older brothers try, but it usually ends up with them all frustrated and telling me that they are "never playing anything with him ever again!" That usually lasts about 5 minutes before they are in there trying again.

   Every morning after we drop the older two off at school, I ask him "What do you want to do today?" About 95% of the time he says he wants to play the Wii. Sometimes I let him. Probably more than I should. Depending on what I need to get done for the day, sometimes that is the only way I can get anything accomplished. Having 3 young boys, I have to get something done every day, or else my  house becomes a danger zone and looks like a tornado came through.

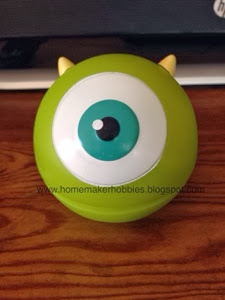
   Some days I don't feel like doing anything. I can usually get my lil one to play a game with me because who doesn't want mom's undivided attention? One of his favorite games is this Monsters University - Dice Game


   I don't know about you, but my kids LOVE Monster's Inc. When we were out trying to find something for my middle one to buy with his birthday money, we found this little game. It's really simple. I guess it's the same as 'Left, Center, Right'. I haven't ever played that one, but I have played this one many times. It's a super fast game if there's only 2 people. Sometimes only taking less than 5 minutes.

   All that is in the game are little tokens with Monster's characters on them and three dice.


   Each player takes 3 tokens. Put the rest in a pile in the middle.


   On your turn, you roll the dice. One of three things will show up. A purple dot that means you keep a token. A finger that points either left or right, that means you pass a token in that direction. If the green eye pops up, you put a token in the middle. Each token has one die for it, up to three. So if you only have two tokens left, you only roll two dice. If you have 3 or more tokens, you just roll the three.


   Whoever ends up with everyone else's tokens wins the game.

   I love how you can open his mouth and you can fit all of the pieces in there. I guess it's also to help little hands shake the dice. We have found that it's easier just to grab a cup if they need help. You have to help them squeeze the mouth open anyway.

   This game is easy enough that my little man can play it mostly by himself. It's nice to throw in between the never ending Hi Ho Cherry-O and Candyland.

   Whenever I have someone ask me if I have any games that would be good for kids, I always tell them about this one. It's a game that all of my kids like to play and they can even play it with each other if mom and dad are busy. It's a good game for teaching kids how to take turns. It's a pretty fast moving game, depending how much shaking of the dice is done before your kid rolls it. It's easy enough that preschoolers can play it with little to no help if they are able to follow directions. My older two can even explain it to their friends and cousins and teach them how to play. I highly recommend this game if you are looking for a game for your children.

   What are some games you like to play with your kids?

Thursday, January 16, 2014

Geek & Sundry

   As some of you know, the hubby and I LOVE watching Table Top. It's where we get a lot of our game ideas. When I started blogging, I decided I would follow a bunch of the big game people with my dormant twitter account that I didn't really use for anything. Table Top is on YouTube and is under Geek and Sundry. They have a lot of geeky stuff on their channel so naturally, I decided to follow Geek and Sundry on twitter.

   A day or two later they retweeted a guy named Paul that has a vlog on their channel. He was looking for nerd crafts people have done. I got pretty excited, shot a text off to the hubby and asked if I should send in this


   That's right, the hubby and I have made a Settlers of Catan board out of Perler Beads. It took quite a while but we had fun. It was a fun little craft about something we both enjoy that we could do together after the boys were in bed. We've even played on it before!

   I got an email back from Paul a lot faster than I thought I would. He said it was super cool and asked if I could send him more pictures. I snapped a few more

   Like as if we were playing a game on it.


   Just the tiles


   All of the pieces. I made sure you can see that the city pieces stand up.


   We made a nice stand up robber, the largest army and longest road cards


   The number tiles


   All of the ports


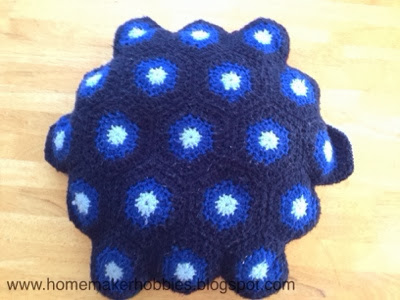
   And just because it was Catan related and another nerd craft, I even sent him pictures of the Catan pillow I crocheted the hubs for his birthday.

   The front


   And the back


   Here's some cookies I made hubby for his birthday. He decided he wanted this instead of a cake a couple years ago.


   This morning when I got up and checked Twitter, I saw that Paul had a new vlog post up. I thought it looked pretty interesting. I mean, who wouldn't want to make themselves some comic book shoes? I figured I had a sister or two that would probably think it was pretty cool as well and I wanted to see how it was done.

   I got it ready and told the hubby we should watch it. We watched Paul make a comic book shoe in fast forward, because that's how he does his crafts on his vlog. When he was done with the shoes he started talking about how he got so many responses for the nerd craft that he was going to do some at the end of each of his upcoming vlog posts until he ran out. Then we see our Settlers board! We were SO excited! I quickly rewound the video a bit so I could show our boys. The oldest one's jaw hit the floor and the middle one asked to watch it again.

   I never figured that one day I would be into all of the geeky nerd stuff. These days though, it seems like that's about all I do. I love playing games. We have many game nights with friends and many with just our family. I love watching Star Trek with my boys every night. My little one asks to watch "tar tec" and loves to "bum bum bum" along with the music. Once in a while he will look at me and say "Pace, the final frontier". We have passed our love of games and super heroes and all things geeky onto our children and that makes me happy.

   Ok, enough of my rambling, here's the video. Feel free to let me know what you think! 
   It has been brought to my attention that the video doesn't show up on a mobile device, so here's the link.


Wednesday, January 15, 2014

Enchilada Casserole

   The other night I made a family favorite. I've had a couple people ask for the recipe, so here it is!

   Keep in mind, I always make a lot of food. I never know how much my growing  boys will eat, and I like left overs for lunch. I don't really have exact measurements and you can change the amounts to how much your family will eat.

   I like putting tortillas, meat, rice, corn, refried beans and cheese in my casserole. Here's how I do it.

   I start the rice first since it takes the longest. I used 4 cups water, 2 cups of rice. I add chicken tomato bullion (1 tsp per cup of water) instead of salt and I add a little garlic. I think this gives the rice a nice flavor.

   Next I cook the meat. I usually use hamburger but you can use what you like. This time I used a pound of hamburger, half of an onion, a can of green chilies, pepper, season salt, and cumin. I don't measure any of it. Just add however much you like. Cook it all together and drain it if needed.


   Warm up the refried beans if you are using them. It makes it a lot easier to spread. Plus this way it doesn't take as long to warm it all up at the end. I used a big can of refried beans, it was 31oz.

   Cook/warm up the corn. I used a pound of frozen corn.

   Get your tortillas and cut them into squares. I'm sure you can do strips or just cut them to fit in the pan. I like squares because it's easier to scoop it out.

   Take your casserole dish and pour in just enough enchilada sauce to cover the bottom. I had a 21oz can of green sauce.


   Lay out the tortillas to cover the bottom.


   Spread out the meat over the tortillas


   Carefully add the beans. They will stick to the spoon and take the meat with it.


   Spread out the rice.


   Spread the corn.


   Add another layer of tortilla


   Pour the rest of the sauce carefully over the top


   Sprinkle cheese on top.


   Put in a 350* oven. Since everything is already cooked, you are mostly just heating it through and melting the cheese. I believe it took about 20-30 minutes since it was a lot of food. Once it's heated through, take it out of the oven and enjoy! You can top with sour cream, salsa or whatever you like on your enchiladas.


   This is one of the few meals that everyone (besides my picky 3 year old that reminds me every night that he "hates dinner" and doesn't want it) will eat a lot of. Most things there is someone that doesn't like it. I know when I make this, I won't be hearing complaints about not wanting it for dinner. They also like helping me make it. They lay out the tortillas while I'm cooking everything up. They enjoy helping out in the kitchen and dinner time is a great time to teach them how to cook.

   I hope you enjoy this as much as we do! What is your family favorite?

Sunday, January 12, 2014

This is literature? A 2 year old could have written this! -Gru


   One of my favorite things to do while watching TV is crocheting. I haven't been crocheting for long. Just over a year or so. I learned the basics when I was a younger and then forgot about it.
 
   I have a friend that crochets so I asked her if she would teach me. I went over, sat down and we began. I already knew how to hold the hook so she basically showed me a couple stitches and I went on my merry way.

   I quickly realized one thing. I am awful at doing squares. I've tried. I've made a friend a baby blanket which was by no means straight around the edges, even though I started over a few times.


   But then I found my place in the crocheting world. Hats. I am really good at doing things that don't need a straight edge. I found I can crochet in a round like nobody's business. My first hats I made I gave to my boys. One got a blue angry bird and the other a red. I'm kind of embarrassed about them now and have debated making them new ones. The problem with that? I keep getting hat orders for these little guys.


   Don't get me wrong, I'm very grateful that people enjoy my work and I'm happy to use my talent to make people happy. (So if you'd like a hat, feel free to let me know) Plus, how cute are these?


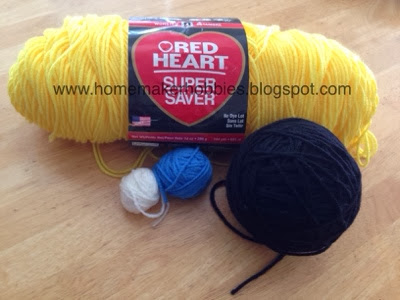
   First, make sure you have the yarn colors you want. For these you would need a bright yellow, black, white, grey and whatever color you want for the bottom. I like using red heart super saver yarn, but whatever you prefer, I'm sure will be fine. Just be careful if you are using a thin yarn. They stretch out faster.


   The pattern I use for most of my hats, I found here. They add in an extra row I don't use (round 6). I also usually use a double crochet instead of a half double.

   When I size the hats, I use my kids for sizes. I have measured their head with a piece of yarn, so when I'm checking to see if the hat is the right size, I lay out the circle and put the yarn around the outside of it to see if it would fit. Remember, always go bigger rather than smaller. Kids will grow before they shrink.


    For the kids hats I do 10 rounds of yellow for the top. For adults I do 11.


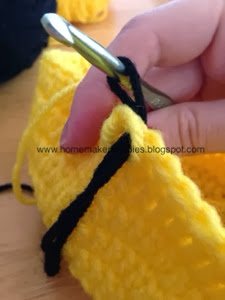
   Changing colors can be tricky. I don't have any awesome trick to use when changing. When I get to the point you need to do a round or two in a different color, I slip stitch color A closed. Take your hook and place it through where your next stitch would go.


 I take the loop of color A and slide my hook through that as well. 


   Take color B and pull it through. Make sure you leave a tail. 


   Chain 2 with color B, which can be easier said than done. 


   Do your double that goes next to the chain and then pull color A tight. 


   I like to take the tail from color B and before I do the yarn over to pull through the stitch, I twist it once with the yarn I'm using. This helps hold the tail in tight so it won't come out. I'm sure you could probably do it a different way as well, but that's how I do it. 


   Do two rows of black. 


   Add 3 more rows of yellow. 4 for an adult. 


  2 rows of your bottom color. If you don't want the ear flaps and braids, you can add a single crochet round here to finish off your hat. If you want them, please continue. (Don't forget to weave in your yarn ends.)


   For the ear flaps, I chain 13 and then double crochet in each one starting in the third one from the hook. This will give you 11 stitches. When you get to the end, chain 2 and flip. Then double crochet two together, double crochet in the next 7 then double crochet the last two together. Chain 2 and flip. Continue the pattern until you have 3 stitches left and tie it off. Make 2 of these. If you're making it for an adult, I add 2 more to the chain so it's a little bigger.


   When I sew the flaps on, I close the hat so the seam is on one fold. Put the ear flap in the middle, chain side up and sew it on using whatever color yarn that part of your hat is. 


    Flip the hat and sew the other one on the other side. 


   Once both of the ear flaps are on, I single crochet all the way around to help hold the ear flaps on as well as giving it a little better finish. 


   For the eyes, I use the same pattern I use for the top of the hat. I do a round of black, two rounds of white and then a grey single crochet around for round 4.  Leave a nice long tail when finishing it off. 


   Now have a little fun with the eyes. What good is a hobby, if you don't have fun with it?


   Open your hat with the ear flaps on both sides and center your eye(s) however you like. Use the tail to sew the eye to the hat. 


   The braid is pretty simple. Decide how long you want the braids. Add a little extra. Now add a little more. When you braid, it will get shorter, plus it takes some yarn when you tie it on. You also need a little extra to be able to trim the ends after. I find something that is about the size I want the yarn and wrap it around. I always make 12 yellow and 24 of the matching color. Each piece of yarn is going to be folded in half, so when it's open, it should be twice as long as you need it. (Hi Jessie!)


   Sort your yarn. You can try mixing it up a bit. So the braid has both colors throughout. 


    Now fold the yarn in half and put your finger through the loop so the yarn is draped over your finger. 


    Put your crochet hook through the middle space on the last row of double crochet on the ear flap. 


    Carefully pull the yarn through. I like to pull it from the outside of the hat to inside so when you loop the ends through, the loop is on the inside. 


   Put your fingers through the loop and pull the ends of the yarn back through.


   Carefully tighten it down. Be careful not to stretch out your hat.


    Braid the yarn and use a piece of yarn to tie the end off.


   I always line up my braids so they are the same length. After you tie them off, check to find a shorter piece of yarn and use that as a guide of where to trim the ends so they match. 

   And now you have a super cute minion hat for your little minions!


   If there is anything you would like to see on my blog, a game to play, a recipe, a pattern, feel free to leave me a comment and I will see what I can do. 


   If you would like to order a hat like this one or another crochet item, feel free to leave a comment below, contact me on Twitter, or order through my Facebook page.