I was talking to hubby about wanting a new hobby to try out since I am going to be
staying home again once the kids go back to school. We got to brainstorming a bit and came up with an idea. Glass etching! We did a bit of research and headed off to the store to grab a few things. Then I got to work to try out a test run. It worked out great and was pretty easy. I decided I wanted to make everyone a jar. I don't know about you, but I get tired of the millions of water cups that fill my counters on a daily basis. This was a fun way to make them all a personalized cup that they can easily keep track of.
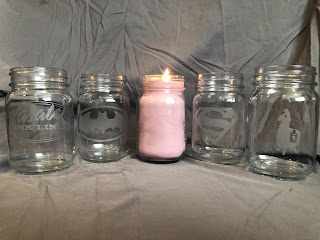
First, I went to all 3 boys and asked them what they would like on their cup. Then I found a picture online and cut it out in some vinyl. I picked out the pieces that I wanted etched into the glass.
Next, I prepped the glass by wiping the jars down with some rubbing alcohol. You want the surface as clean as possible.
I used transfer tape to get the vinyl off of the backing while keeping all of the pieces lined up where they need to be.
Peel off the vinyl backing and use the tape to attach the vinyl to the jar. Working from the middle out helps keep out the bubbles.
Carefully peel off the transfer tape. Next you want to inspect for bubbles around the cut edges. You need to make sure that the vinyl is attached and flat around the picture. You don't want the etching cream to find its way under the vinyl. This way you will get nice, crisp lines.
Now you can add some crafting tape around the edges. You don't have to do this step, but it gives you a little more protection while using the etching cream.
I only add the tape to the sides where there isn't much vinyl edging.
Now you are ready to etch. Prep your work area. It is recommended that you use disposable gloves since the etching cream is acid based. You don't want to risk it getting on your skin. You also want to make sure you protect whatever surface you are working on.
Apply some etching cream, making sure you get into every little space. Here is where I've found some differing opinions on how to do it. I've read that you can blob some on there and let it sit. You can let it sit while moving it around every minute or so. You can constantly move it around. What I do is, I will move it around in a circular motion. This way if there are any crystals they won't cause light spots. This also makes sure that you get all the way to the edges of your design.
If I'm doing more than one project at a time, I will let the finished project sit while I work on the others. Leaving it on longer than a couple minutes won't hurt anything.
When you are done, wash the cream off with running water. Check your etching cream for warnings about where you rinse. You don't want to end up etching the finish off of your sink. You also want to be careful while doing this so that you don't get etching cream on the exposed areas of your project. You don't want random etched spots.
Once you have rinsed all of the etching cream, peel off the tape and the vinyl. Once I have removed everything, I give it another rinse to make sure all of the cream has been removed.
Towel dry your project.
You are now done!
Go ahead and admire your new custom made glass. I decided to turn mine into a candle. Once it has burned out, I can clean it out and still use it as a cup.
This has been such a fun thing to try out. My hubby and kiddos all love having their own glass (and I love not having to wash a ton of cups every day!) I have gotten a few different types of things to etch on next so I can test how it works. If there's anything you would like to see etched, go ahead and leave a comment and I will see what I can do!


