Showing posts with label DIY. Show all posts

Tuesday, March 24, 2020

Please, Be Yourself

     I saw two things on Facebook this week that I really liked. I thought I would take the two things and turn it into a craft for myself.

     The first thing I saw was a little craft idea for kids. It was done on the brick wall in someone's backyard. They took tape and made a big square and then made shapes inside. The kids colored in the spaces and when it was done, they took the tape off and hand a neat design on their wall.

     The second thing I saw was a cross stitch one of my cousins did. It said "Welcome Feel free to be yourself." This struck a cord with me. 


     I try to have our house be a judgement free zone. I'm a firm believer that there is good in everyone. 

     Everyone has a different background, different struggles, different beliefs. No one fits perfectly inside of a box. We are all just one piece of a giant puzzle. I believe our differences are what makes us special, what makes us shine.

     No one should have to hide their shine.

     "Why fit in when you were born to stand out!" Dr. Seuss


Friday, October 11, 2019

Stencil Painting

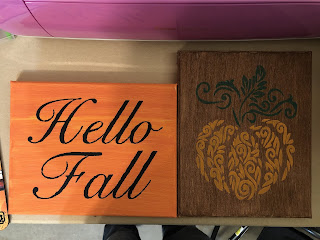
     A couple weeks ago I was talking to a friend and trying to come up with a craft idea we could do together. I wanted to make some decorations for the upcoming holidays but I'm not very crafty as far as painting goes. I decided to try out painting with a stencil. I ran to the store and grabbed some canvases and paint. I tried it out before I got together with my friend since I have never tried it before. This is what I ended up with. Not too bad for my first try.


     I settled on doing a Fall craft. Fall is my favorite season. I love the colors, the cooler weather, sweaters, hot chocolate, and pumpkin everything. I had an idea in my head and wanted to see if I could get it out. I gave it a go and almost got what I was going for.


     We had such a good time crafting together that we got together again the following week to do another one. This is my favorite one I've done. I love how the background almost looks like wood and the muted colors of the pumpkin.


     Since I now had two that I could use for Fall, I wanted to try to do a tree at sunset that would fit in with the Halloween season. I found a silhouette of tree that I liked and prepped it in design space.


     While my vinyl was being cut I got my paint area ready.


     I picked a few of my favorite sunset colors for the background


     I dribbled a little of each color on my canvas and then lightly brushed it. I only wanted the colors to blend slightly.


     Once the paint dried, I applied my vinyl stencil.


     I painted over the stencil with some black and then peeled the vinyl off while the paint was still damp.


     My picture was complete!


     My pair of Halloween decorations.


     My pair of Fall decorations


    These are fast and easy which makes them perfect for when you need a little creative outlet. I'm already trying to decide what set I could do with my kids.

Thursday, October 8, 2015

New Floors

   Back in August we went on a week long vacation to go see my sister and hubby's cousin get married. (No, not to each other, two different weddings.) When we got home, I noticed the house smelled a little musty. While we were gone, the water heater decided it needed to break. If you've never had this happen to you, it's not very fun. We ended up with holes in the walls and a torn up carpet.

   We have been talking about getting new flooring in the house for a while. It wasn't that great when we moved in and wasn't in any better shape after having three boys living on it. We did some research and looking around. We found some self adhesive vinyl wood planks. They looked nice and it was something we could do on our own. We bit the bullet and ordered up enough for our whole house.

   Even though these are vinyl planks, you still have to let them acclimate for a couple days before installing. You can use this time to get your floors ready.
 
 
   You are going to need to move out all of your furniture. You probably already know this, but this footprint in the carpet from our Lego guy makes me laugh so I wanted to share.


   The easiest way to get the carpet out is to cut it into strips. Then you can carry it out easier.
 

   Once you move the carpet pad, you may be surprised that you now have to rip out some linoleum as well. This is a nightmare when trying to do floors. Why someone would lay some cheap carpet over linoleum in the dining room is beyond me. This carpet would have been gone a long time ago if I had known.
 
 
   You need to scrape everything off of your floors that you can. The smoother the better. If you have tile anywhere, this is easier said than done.
 
 
   One trick we found for getting up linoleum glue is to use boiling water and let it sit for fifteen minutes. This didn't work very well since the water cooled down too fast and the water wouldn't stay put. We tried putting it on towels which helped a little, but it was still a lot of work!
 
 
   When you pull up the carpet strips, you are going to have some holes in the concrete. You will need to fill these as well. Remember, you are trying to get it as clean and level as you can. Before you lay your planks, you need to sweep the floor and give it a light mop. You can't lay your planks until the floor is dry, so a damp cloth is good enough. You are just getting the rest of the dust cleaned up.


   The planks have arrows on the back of the paper. When placing your planks, you will want to make sure that the arrows always face the same direction. This keeps the grains in the wood flowing and looking nice.
 
 
   They recommend that you measure out the room and start in the middle. We laid out the planks across the room to make sure they would fit from wall to wall. They did so we just started in a corner. We cut one plank in half to start the next row. You will want to off set the seams just like when using real wood planks. You can pick it back up if you didn't get it quite right the first time, but try not to move them around too much..
 

   We did all of the full planks we could before measuring out the ends. We did use the half planks across the top of the room to keep everything lined up right.
 
 
   Keep going, lining up your planks end to end. You may need to do some tricky measuring and cutting along the way, but for the most part, it's pretty easy.

 
   With these planks, you can cut across the top and then bend it and it will snap apart.

 
   Once the floor is installed, you have to wait forty eight hours before cleaning it. You will have some sticky spots from touching the glue on the back of the planks. I found this lemon oil works great at spot cleaning the sticky spots.

 
   Once you clean your floor, you can move your furniture back into your house and feel good knowing you did it yourself!.


   Doing your own floors is a lot of work and time consuming. I was kind of surprised how long it took to get the floor ready to just lay something over the top of it. I have to say, I absolutely love my new floors and can't help but feel proud knowing we did it ourselves. It makes it feel like a whole new house!


Wednesday, October 15, 2014

Directions: DIY Lords of Waterdeep and Expansion Storage

   Since I have had some interest in how to make the storage for the Lords of Waterdeep and it's expansions, here is how we made it.

   First, you will need some plastic canvas. This can be found in just about any craft store. If you get this size, it is a perfect fit for the bottom of your box. You will only need one package. This one had six pieces in it and we had some left. I also just counted squares, so it doesn't matter whether you use the metric system or the imperial system. It is the number of squares that matter.


   You will also need yarn and a yarn needle. Yarn needles have a larger eye (the hole in the needle) and are blunt on the other end. This project doesn't take much yarn and you are more than welcome to do it all in one color. We color coordinated ours, but we always have more yarn around than I would ever admit to.

   Sewing:

   If you have never sewn plastic canvas before, it is rather easy. Cut out your pieces. You are going to want to cut it in the squares next to the ones you need and then trim it up.


   Lay your two pieces together. These are scraps so they don't quite line up, but all of yours should.


   Thread the yarn onto your needle, and then put it through a corner, leaving a little tail.


   Next, you are going to sew up the side of your seam. You will put the needle through the opposite side of where the yarn is coming from so it wraps around the edge.


   Once you are done, you are going to put your needle through a few rows of the yarn.


   Pull it through, and then trim it off. This will hold the yarn in place. You don't have to go all the way through the bottom, a few rows should be fine.


   You can now bend your pieces how you need them to make your boxes.


   Directions:

   For the base, take a full sheet of the canvas. You will also need two 13x70 strips and two 13x90 strips. These are for the sides. For the dividers on the inside, you will need four 8x70 and four 8x24.
   Attach them how they are in the following picture.


   For the deck boxes you will  need eight 17x17 for the top and bottom and twelve 17x15 for the sides. This will be enough to make the four open ended deck boxes.


   For the individual player bits, you will need twelve 7x10 for the short sides, twelve 7x19 for the long sides and six 10x19 for the bottom.


   For the game bits, you will need two 7x70 for the sides, one 8x70 for the bottom and five 7x8 pieces for the ends and the dividers.
   For the cubes, you will need two 7x10 for the sides, one 9x70 for the bottom and five 7x9 pieces for the ends and dividers.


      You are now ready to put your inserts into your game box!


   I hope this tutorial was easy to follow. If you have any questions, please feel free to ask and I will get back to you as soon as I can. Until then, happy crafting!

   If you would like to read my review of this game, it can be found here.

Wednesday, October 8, 2014

DIY Lords of Waterdeep and Expansion Storage

   One game that takes up a lot of space due to the many components that come in it, is Lords of Waterdeep. Yes, the box has a lovely insert that keeps everything nicely in it's place. But if you take this, and add it with the expansions, you now have two heavy boxes full of little bits.


   This can take up a lot of space on your game shelf, and if you are anything like us, we need all of the space we can get!


   So, hubby and I came up with a plan. Okay, it was mostly hubby's idea, but I helped... a little. It was nice, everything still fit nicely in the box.


There was still room for the board, even though we used the smaller expansion box.


   Everything from both boxes still has it's own little spot. We used plastic mesh to make little compartments for everything. It's even sorted by the base game and the expansion.


   The bottom is measured up to be the same size as the inside of the box. We split it up to hold all of the different sizes of compartments. If you needed to, you could remove the whole thing from the box.


   Everything can be taken out of the box which saves a lot of table space! Everything is color coordinated. The base game is sewn together with black yarn, Undermountain is orange and Skullport is blue. This saves you time when you want to play with only one part of the expansion. The building cards are next to the matching cards in the box.


   Each player gets their own little color coordinated compartment with all of their bits in it. It's plenty big enough to store them neatly, or you can just throw them all in there.


   This project was pretty time consuming, but very simple. We had to measure everything up and make sure there was space on the top of everything to hold the boards and the rule books. Measuring wasn't too difficult, you just have to count the squares. Once everything was measured and cut, we were able to sew it together pretty easily. This is a great way to downsize the boxes on your shelves. It's also simple enough you can do it while watching tv, listening to music, or just visiting with a friend.

   If you would like to learn how to play this game, my review can be found here.
   If you would like the directions on how to make the inserts, it can be found here.