Lords of Waterdeep
is a worker placement style game. When you open the box, you may be intimidated by all of the different game pieces. Don't give up! It's fun and easy to learn. Here's some help to get you started.
When you open the box, you will see this. Every piece has it's own designated compartment (OCD people may breath a sigh of relief now).
Here is the empty board before you set up the game.
The top row of meeples are your agents; there are five of each color. The second row has score markers that coordinate with each players color of agents. The third row is 100 point victory tokens. A player earns this once he has gone around the Scoring Track once. The final row is building control markers; there are nine of each color.
The white castle piece is the First Player marker. If you place your agent in Castle Waterdeep, you get to take the First Player marker and an Intrigue card. The Lieutenant is brown and the Ambassador is white. These can be added to a users pool under certain circumstances.
This is the money in the game. The squares are worth one and the moons are worth five.
These are the adventurer cubes. The white cubes are clerics. The orange cubes are fighters. The black cubes are rogues. The purple cubes are wizards.
The object of the game is to complete quests. These are the quest cards. There are 5 quest types: Arcana, Commerce, Warfare, Piety, and Skullduggery.
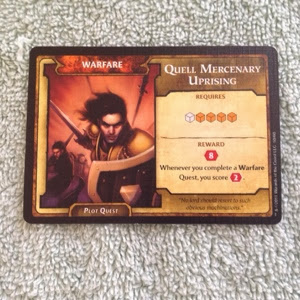
This is a Warfare quest card. To complete it, you need to collect one cleric cube and 4 fighter cubes. When it's complete, you earn 8 victory points. Each quest card requires you to collect different adventurer cubes and yields various rewards (adventurers, points, cards). This particular card is a Plot Quest. Once this type of quest is completed, it has an ongoing reward. On this card, the ongoing reward is 2 Victory Points whenever you finish a Warfare Quest. Most quest cards are not plot quests and their reward is given one time only.
These are victory point tokens.
Here are the building tiles. Each tile has a specific name. The cost to build each card is in the upper left corner. Under the name is the start-of-round effect (if there is one). In the center, you will find the instructions. In the lower right corner, the player who purchases the tile places his/her control marker. The owner benefit can be found in the lower left corner. If the owner uses the tile, they do not get the benefit.At the beginning of each round, a victory point is placed on each building in the building hall. When your purchase the building, you earn any points piled on top. To build, you place your agent in the Builder's Hall. You then pay the cost and set up your building in one of the empty building spaces. Don't forget to move your score marker for each Victory Point piled on top.

This is an Intrigue card. These are always kept face-down. These cards can be an attack, utility, or a mandatory quest. To play an intrigue card, place your agent in Waterdeep Harbor. The effect caused by this card only happens once for the player who uses it. If you place an agent in Waterdeep Harbor so you can use an Intrigue Card, you get to reassign your agent to an empty action space when the round is finished.
This is another type of Intrigue card. When another player gives you a Mandatory Quest card, you must complete it before you can complete any of your other quests.
There are 5 player mats. Each player chooses one that is associated with an agent of the matching color. This is where you store your items: adventurer cubes, building control markers, gold, agents, and completed quests.
Every player is given a Lord Card which is placed face down at the bottom of the player mat. This is a secret so the other players won't know what you have. These cards score points at the end of the game. For instance, the following card gives 4 additional points for each Arcana and Piety quests completed. Every Lord card is different.
Here is an example of how to set up the player mat. Quests are placed face-up on the left before you complete them. When finished, they are placed near the bottom of the player mat unless it is a plot quest; a completed plot quest is placed face up on the right. Agents go on the top, control markers are under the agents, and the gold and adventurer cubes go in the middle, called the Tavern. The Lord Cards are placed face down underneath the bottom of the card.

When the board is set up, it will look like this. All the spaces are labeled so it is pretty easy to set up. Each player places one of their agents in the Round 5 space of the rounds track (every one gets that back in the 5th round.) The Intrigue cards go near the bottom of the board. The Building Tiles are placed on the other side, opposite of the Intrigue Cards. Put out one building tile on each building space. The center of the board has permanent buildings as well. Place 3 Victory point tokens on each space of the rounds track. In the corner, underneath the words "Dungeons and Dragons," are the Quest cards. Place all the cards face-down in that spot. Draw four Quest cards and put them next to it. The discard pile is on the other side of that. All score markers are placed on zero. The scoring track goes around the outside of the board. The number of agents you start with depends on the number of players playing. Each player starts with the specified number of agents. The first player receives four gold. Each player to the left receives one more than the previous player. Deal each player two face-up Quest cards and two face-down Intrigue cards.
Now it is time to play!
At the beginning of each round, place the victory point tokens from the rounds track on each building tile in the Builder's Hall. Then the first player assigns an agent to a building on the board and takes the action. If and agent is placed on Field of Triumph, then the player takes two fighters. At the end of your turn, you may complete one quest if you have all the needed components. Place one agent at a time; play moves left until all agents have been placed. If any agents have been placed in Waterdeep Harbor, their players move them to any remaining buildings on the board. This ends the round.
At the beginning of the next round, remember to place the victory point tokens on the building tiles. Continue play as described above for eight rounds.
At the end of the game, the fun part is scoring. While you have been watching players' score markers move around the board, now is the time when you really see who has been winning all along! If you have any adventurers in your Tavern, you get one point per adventurer cube. Next, give one victory point per every two gold. Next, your reveal your Lord card and award the points as listed. The player with the most points wins! Here is an example of completed quests at the end of the game and the Lord card. This player completed 6 Commerce and 2 Warfare. The card states that 4 points are given for each of those type of quests so the player would be awarded 32 points.
There are many aspects we love about this game.
- the container organizes all the pieces very well
- the art is colorful and interesting
- it's easy to learn and fast paced but the game is still challenging
- it has an expansion so more players can participate
- it's fun trying to get what you need before your opponents take it
- it is not based completely on chance; strategy is an important part of this game
This game is a lot of fun and we hope you enjoy it as much as we do. Will you be the greatest Lord of Waterdeep?