Friday, October 11, 2019

Stencil Painting

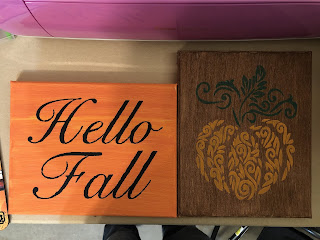
     A couple weeks ago I was talking to a friend and trying to come up with a craft idea we could do together. I wanted to make some decorations for the upcoming holidays but I'm not very crafty as far as painting goes. I decided to try out painting with a stencil. I ran to the store and grabbed some canvases and paint. I tried it out before I got together with my friend since I have never tried it before. This is what I ended up with. Not too bad for my first try.


     I settled on doing a Fall craft. Fall is my favorite season. I love the colors, the cooler weather, sweaters, hot chocolate, and pumpkin everything. I had an idea in my head and wanted to see if I could get it out. I gave it a go and almost got what I was going for.


     We had such a good time crafting together that we got together again the following week to do another one. This is my favorite one I've done. I love how the background almost looks like wood and the muted colors of the pumpkin.


     Since I now had two that I could use for Fall, I wanted to try to do a tree at sunset that would fit in with the Halloween season. I found a silhouette of tree that I liked and prepped it in design space.


     While my vinyl was being cut I got my paint area ready.


     I picked a few of my favorite sunset colors for the background


     I dribbled a little of each color on my canvas and then lightly brushed it. I only wanted the colors to blend slightly.


     Once the paint dried, I applied my vinyl stencil.


     I painted over the stencil with some black and then peeled the vinyl off while the paint was still damp.


     My picture was complete!


     My pair of Halloween decorations.


     My pair of Fall decorations


    These are fast and easy which makes them perfect for when you need a little creative outlet. I'm already trying to decide what set I could do with my kids.

Thursday, July 25, 2019

Glass Etching

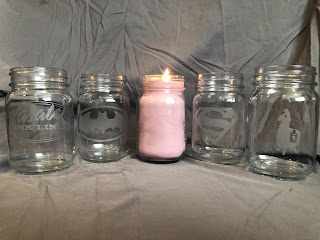
     I was talking to hubby about wanting a new hobby to try out since I am going to be staying home again once the kids go back to school. We got to brainstorming a bit and came up with an idea. Glass etching! We did a bit of research and headed off to the store to grab a few things. Then I got to work to try out a test run. It worked out great and was pretty easy. I decided I wanted to make everyone a jar. I don't know about you, but I get tired of the millions of water cups that fill my counters on a daily basis. This was a fun way to make them all a personalized cup that they can easily keep track of.


     First, I went to all 3 boys and asked them what they would like on their cup. Then I found a picture online and cut it out in some vinyl. I picked out the pieces that I wanted etched into the glass.


     Next, I prepped the glass by wiping the jars down with some rubbing alcohol. You want the surface as clean as possible.


     I used transfer tape to get the vinyl off of the backing while keeping all of the pieces lined up where they need to be.


     Peel off the vinyl backing and use the tape to attach the vinyl to the jar. Working from the middle out helps keep out the bubbles.


     Carefully peel off the transfer tape. Next you want to inspect for bubbles around the cut edges. You need to make sure that the vinyl is attached and flat around the picture. You don't want the etching cream to find its way under the vinyl. This way you will get nice, crisp lines.


     Now you can add some crafting tape around the edges. You don't have to do this step, but it gives you a little more protection while using the etching cream. I only add the tape to the sides where there isn't much vinyl edging.


     Now you are ready to etch. Prep your work area. It is recommended that you use disposable gloves since the etching cream is acid based. You don't want to risk it getting on your skin. You also want to make sure you protect whatever surface you are working on.


     Apply some etching cream, making sure you get into every little space. Here is where I've found some differing opinions on how to do it. I've read that you can blob some on there and let it sit. You can let it sit while moving it around every minute or so. You can constantly move it around. What I do is, I will move it around in a circular motion. This way if there are any crystals they won't cause light spots. This also makes sure that you get all the way to the edges of your design.


     If I'm doing more than one project at a time, I will let the finished project sit while I work on the others. Leaving it on longer than a couple minutes won't hurt anything.


     When you are done, wash the cream off with running water. Check your etching cream for warnings about where you rinse. You don't want to end up etching the finish off of your sink. You also want to  be careful while doing this so that you don't get etching cream on the exposed areas of your project. You don't want random etched spots.


     Once you have rinsed all of the etching cream, peel off the tape and the vinyl. Once I have removed everything, I give it another rinse to make sure all of the cream has been removed.


     Towel dry your project.


     You are now done!


     Go ahead and admire your new custom made glass. I decided to turn mine into a candle. Once it has burned out, I can clean it out and still use it as a cup.


     This has been such a fun thing to try out. My hubby and kiddos all love having their own glass (and I love not having to wash a ton of cups every day!) I have gotten a few different types of things to etch on next so I can test how it works. If there's anything you would like to see etched, go ahead and leave a comment and I will see what I can do!

Sunday, July 21, 2019

New Beginnings

     This past year has been a busy one. I was working. Kids were in sports. We got a new puppy.  Then hubby got a new job in another state. Two and a half weeks later, hubby was gone. The boys and I stayed behind to finish school, pack and sell the house, and do the other million things that go along with moving.


     Moving from Las Vegas to Utah was a big change for us. The boys and I have only known Vegas. Sure, we would come visit family in Utah from time to time, but we were all native Las Vegas citizens. Leaving our family and friend was hard, but we were exited for our new adventure!


     Now that we are settled, I decided I wanted to try out a new hobby. I'm going back to being a stay at home mom again so I wanted to try something new. After all, this was the start of a new chapter in our lives.

     Amazon Prime day gave me that opportunity.


     I found a Cricut bundle that was a great deal. It came with the Cricut Explore Air 2.


     And a bunch of other goodies.


     After reading some reviews, I was both excited and slightly nervous. There were a few people that said they had trouble installing and using the Cricut. 


     I am happy to say, installing it was a piece of cake! It came with simple directions that were easy to follow.


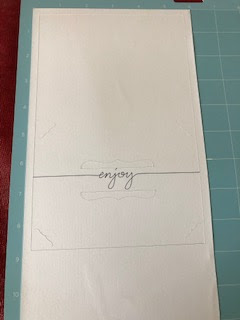
     It even came with a beginer project so you could get a little hands on learning. It was very easy to make. It even shows you your projects progress right on your screen.


     I loaded up the machine and in a matter of minutes, I had my first completed project.


     A cute little card.


     I already have a few ideas in the making for what I would like to do with my Cricut. I'm excited for this new beginning with not only moving to a new place, but having the opportunity to spread my crafting wings and trying something new.
 

Thursday, January 3, 2019

My Favorite Beanie Pattern

     One of my favorite things to crochet are beanies. They are quick to work up and you can make them into just about anything you can imagine.They are a great little project to work on while watching tv in the evenings and only takes a couple hours to complete.


     Since I went back to work last year, I am outside a lot more often. With these colder temperatures blowing in, I decided it was time to dust off the crochet hooks and make some beanies. I went to the store and decided to get some soft, chunky yarn. I made 6 nice, warm beanies fairly quickly.


     This pattern makes it easy to add stripes to your hat. I've also used this pattern to add mohawks, hair, ear flaps with braids... I've even used it to make baby cocoons. The possibilities are endless!


     One of my favorite things about this beanie pattern is it's easy to adjust to the right size. You can always stop when it's the right circumference or when it's long enough. I use the pattern more as a generic guideline and make each one specific for the person I've made it for.


     Now, onto the pattern. I usually use a double crochet, but I have made them with half doubles and I've even made some with single crochets. It all just depends on your personal preference and what your needs are.

Round 1:  Magic Ring. CH 1, 10 DC inside ring. Join into first DC. (10 DC)

Round 2: CH 1, 2 DC into same stitch and into each stitch around, join to first DC (20 DC)

Round 3: CH 1, 2 DC into  same stitch, 1 DC into next DC.**2 DC into next DC, 1 DC into                      next DC. Repeat from **around. Join to first DC (30 DC)

Round 4: CH 1, 2 DC into same stitch, 1 DC into next 2 DC, ** 2 DC into next DC, 1 DC into                  next 2 DC. Repeat from ** around. Join to first DC (40 DC)

Round 5: CH 1, 2 DC into same stitch, 1 DC into next 3 DC, ** 2 DC into next DC, 1 DC into next 3 DC. Repeat from ** around. Join to first DC (50 DC)

Round 6: CH 1, 2 DC into same stitch, 1 DC into next 4 DC, ** 2 DC into next DC, 1 DC into next 4 DC. Repeat from ** around. Join to first DC (60 DC)

Round 7-20: CH 1, DC into same stitch and each stitch around. Join to first DC (60 DC)

Finish off and weave in ends.


     And that's all there is to it! What kind of beanie should I try next?