

Friday, October 31, 2014
Happy Halloween
Due to spending time with family, I don't have a blog review for today. However, Boogie Woogie, Pumpkin Jack and all of us at Homemaker Hobbies would like to wish you all a safe and happy Halloween!
Wednesday, October 29, 2014
A Tutu For Darth Vader
A few months ago, my five year old daughter asked to be Darth Vader for Halloween but she won't settle for just plain old Darth Vader in black. She wants glitter, sparkles, purple, and a tutu. Somehow she got me to agree to make her a tutu and bling out a Vader uniform. I am so busy and I just didn't know how I would have have the time to do that. She may have used the force on me because I agreed and will now move along to a blog tutorial on how to make a Blinged Out Sparkley Darth Vader in a Tutu costume. I have to be careful about that. This spunky girl has used the force before and isn't afraid to use it again.
Apparently, she finally did "give herself to the dark side and learned the true nature of the force." At least for Halloween.
First, let's learn how to make the tutu. You won't even need to use the force on this one because it is so easy. Since I can't sew and have very little time, I did this the easiest way I could figure out. It was also very inexpensive. To make this tutu, you only need two things: ribbon and tulle. The ribbon can be any width you like. You will be tying the tulle onto the ribbon. If you use wider ribbon, the bow that ties the tutu closed will be bigger. If you want a prominent, fluffy bow, use wider ribbon. If not, use thinner ribbon. The easiest type of tulle to buy is tulle ribbon so you don't have to cut it into strips. Because it was on sale at the craft store, my tulle came on a spool and was 6 inches wide. This is wider than I usually use but it still worked fine without being cut.
Then, I measured my ribbon for the waist band. To do this, I simple wrapped the ribbon around my daughter's waist and added some extra so it would tie later.

Next, I determined how long I needed to cut the tulle strips. I measured the length between my daughter's waist and the point just above the knee. Then, I doubled it and added about an inch. My tulle strips were about 20 inches. The length of the strips will vary depending on the height of the future tutu wearer. If you make one of these, make sure you measure first because 20 inch strips might not work on your little one. I think as a general rule, that minions of the dark side get cranky when their tutus aren't the right length. The real reason the Emperor has so few apprentices is that the Emperor couldn't make a decent tutu if his life depended on it. He loses so many prospective evil followers that way.
Now, you can cut all your strips. How many should you cut? Well, that depends on the tutu. The wider the waist, the more strips you'll need. The more strips you use. the fluffier it will will be. For less fluff, don't add as many strips. This tutu had 25 strips.

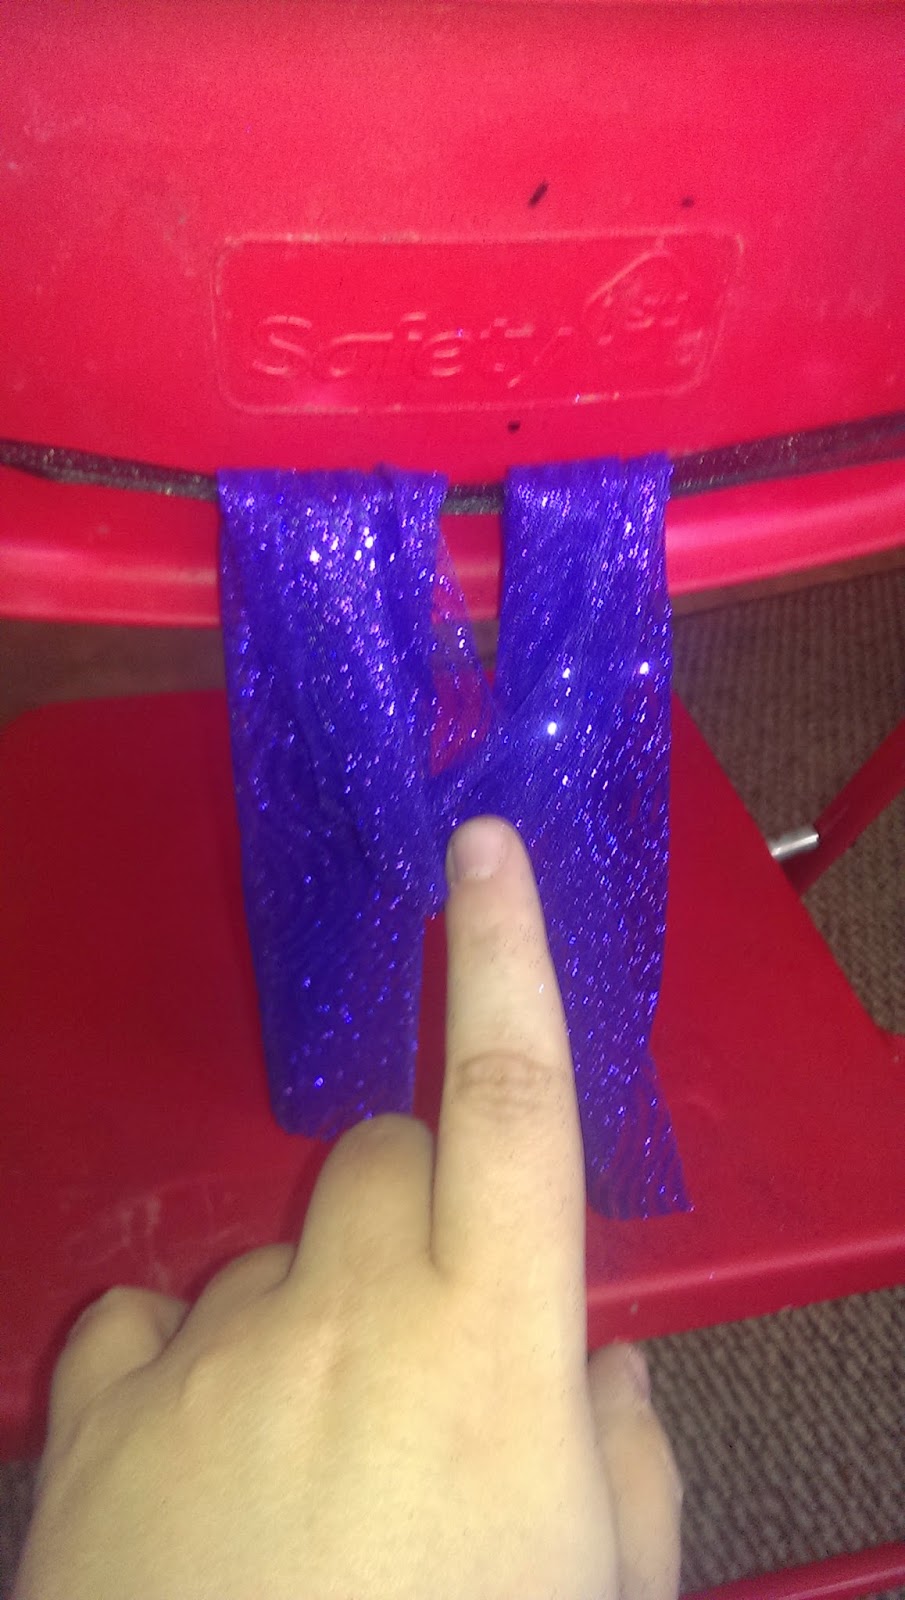
We are now ready to make this tutu happen. To do this, tie your waist band ribbon around a chair like this. This makes it easier to tie the tulle onto the ribbon.

Fold your tulle in half. You will notice my tulle is rather wide and stiff and makes this a little difficult. As a rule thinner, soft tulle ribbon is easier to work with and will make more uniform knots. My tulle is covered in purple glitter so it is a little stiff; but this is the tulle my little dark lord chose, so I made it work. Working for someone that can force choke you at will without lifting a finger can be pretty stressful. "Look Mom, no hands" :) Thankfully, this is so easy that even I am bound to get this one right!
Tuck your folded tulle behind the ribbon on the chair.

Fold over the top, so you can see a loop.
Tuck the hanging parts of the tulle through the loop, and pull tight. Make sure you pull both ends of the tool through the loop so the your tulle pieces are about the same length. Your tulle is now tied securely to the ribbon.

Repeat this step with another strip tied next to the first. Continue doing this until you have enough. If you put the knots very close to each other, the tutu will be fluffier. If you spread them out a little, they won't. The good thing about this is that you can adjust them whenever you need to by sliding them closer or farther from each other.


Because Vader wears a cape, I made my tutu so it doesn't have much of a back and it wouldn't push out the cape. To close the tutu, simple wrap it around the child's waist and tie. You can adjust and fluff it after you tie it if you need to. You wouldn't want to appear to be a scruffy looking nerf-herder with fluffless tutu.
That's it, the tutu is made. It's purple and sparkly and matches her light saber. As a graduate of the Jedi Training Academy, my 5 year old often uses the skills she learned in How to Use the Force and Look Fabulous 101 and you can see this in her bold style choices. (Today she is wearing Toy Story Pajamas, mismatching socks, and a ski cap. Yoda would be proud.)

I wish my costume making could end there but this Vader can't destroy her enemies unless she has some bling. I bought a cheap box of assorted purple jewels of various sizes and shades. I also bought Aleene's Super Fabric Glue to attach them. This glue is great; it dries slow enough that you have about 10 seconds to reposition a jewel if you need to.

To attach the jewels, I used a toothpick. I dabbed the toothpick into the glue and used it to apply the glue to the back of the jewel so I wouldn't get too much glue. Then, I placed it on the fabric. I added jewels to her Darth Vader uniform, mask and cape.
My little Darth Vader can't wait to strut her stuff in the annual costume contest. I can't post the finished project yet but it will debut on October 31st. I'm sure her adorable tutu and bejeweled cape will strike fear in the hearts of Rebels everywhere.
Onto the next projects...Princess Leah hair for my oldest daughter and a Luke Skywalker costume for my son. A jedi mother's work is never done. #starwarsfamilyforever
Apparently, she finally did "give herself to the dark side and learned the true nature of the force." At least for Halloween.
First, let's learn how to make the tutu. You won't even need to use the force on this one because it is so easy. Since I can't sew and have very little time, I did this the easiest way I could figure out. It was also very inexpensive. To make this tutu, you only need two things: ribbon and tulle. The ribbon can be any width you like. You will be tying the tulle onto the ribbon. If you use wider ribbon, the bow that ties the tutu closed will be bigger. If you want a prominent, fluffy bow, use wider ribbon. If not, use thinner ribbon. The easiest type of tulle to buy is tulle ribbon so you don't have to cut it into strips. Because it was on sale at the craft store, my tulle came on a spool and was 6 inches wide. This is wider than I usually use but it still worked fine without being cut.
Then, I measured my ribbon for the waist band. To do this, I simple wrapped the ribbon around my daughter's waist and added some extra so it would tie later.
Next, I determined how long I needed to cut the tulle strips. I measured the length between my daughter's waist and the point just above the knee. Then, I doubled it and added about an inch. My tulle strips were about 20 inches. The length of the strips will vary depending on the height of the future tutu wearer. If you make one of these, make sure you measure first because 20 inch strips might not work on your little one. I think as a general rule, that minions of the dark side get cranky when their tutus aren't the right length. The real reason the Emperor has so few apprentices is that the Emperor couldn't make a decent tutu if his life depended on it. He loses so many prospective evil followers that way.
Now, you can cut all your strips. How many should you cut? Well, that depends on the tutu. The wider the waist, the more strips you'll need. The more strips you use. the fluffier it will will be. For less fluff, don't add as many strips. This tutu had 25 strips.
We are now ready to make this tutu happen. To do this, tie your waist band ribbon around a chair like this. This makes it easier to tie the tulle onto the ribbon.
Fold your tulle in half. You will notice my tulle is rather wide and stiff and makes this a little difficult. As a rule thinner, soft tulle ribbon is easier to work with and will make more uniform knots. My tulle is covered in purple glitter so it is a little stiff; but this is the tulle my little dark lord chose, so I made it work. Working for someone that can force choke you at will without lifting a finger can be pretty stressful. "Look Mom, no hands" :) Thankfully, this is so easy that even I am bound to get this one right!
Tuck your folded tulle behind the ribbon on the chair.
Fold over the top, so you can see a loop.
Tuck the hanging parts of the tulle through the loop, and pull tight. Make sure you pull both ends of the tool through the loop so the your tulle pieces are about the same length. Your tulle is now tied securely to the ribbon.
Repeat this step with another strip tied next to the first. Continue doing this until you have enough. If you put the knots very close to each other, the tutu will be fluffier. If you spread them out a little, they won't. The good thing about this is that you can adjust them whenever you need to by sliding them closer or farther from each other.
Because Vader wears a cape, I made my tutu so it doesn't have much of a back and it wouldn't push out the cape. To close the tutu, simple wrap it around the child's waist and tie. You can adjust and fluff it after you tie it if you need to. You wouldn't want to appear to be a scruffy looking nerf-herder with fluffless tutu.
That's it, the tutu is made. It's purple and sparkly and matches her light saber. As a graduate of the Jedi Training Academy, my 5 year old often uses the skills she learned in How to Use the Force and Look Fabulous 101 and you can see this in her bold style choices. (Today she is wearing Toy Story Pajamas, mismatching socks, and a ski cap. Yoda would be proud.)
I wish my costume making could end there but this Vader can't destroy her enemies unless she has some bling. I bought a cheap box of assorted purple jewels of various sizes and shades. I also bought Aleene's Super Fabric Glue to attach them. This glue is great; it dries slow enough that you have about 10 seconds to reposition a jewel if you need to.
To attach the jewels, I used a toothpick. I dabbed the toothpick into the glue and used it to apply the glue to the back of the jewel so I wouldn't get too much glue. Then, I placed it on the fabric. I added jewels to her Darth Vader uniform, mask and cape.
 |
| Just a little sparkle so her enemies face their destruction with a smile... |
 |
| Bold shoulders for the this Empire leader...It's all the rage. All the storm troopers will be asking for purple jewels on their uniform in 2015. |
 |
| It is not complete without bejeweled cybertronic buttons. |
My little Darth Vader can't wait to strut her stuff in the annual costume contest. I can't post the finished project yet but it will debut on October 31st. I'm sure her adorable tutu and bejeweled cape will strike fear in the hearts of Rebels everywhere.
Onto the next projects...Princess Leah hair for my oldest daughter and a Luke Skywalker costume for my son. A jedi mother's work is never done. #starwarsfamilyforever
Monday, October 27, 2014
Play it Forward
I received an email today from a lady asking me if she could use my perler bead Settlers of Catan. She wants to make one so that she can auction it off. She's doing a charity fundraiser event called Play it Forward to help support the Multiple Myeloma Research Foundation. It is happening in Indianapolis on December 13, 2014.
If you live in the area or know someone who does that loves to play games and help a good cause, please help spread the word. If you would like to help, but can't get there, you can donate on either her site or the MMRF site as well.
If you would like to donate items for the auction, I am more than happy to put you in touch with her. Let's all help spread the word and raise awareness for this cancer that doesn't have a cure and has a low survival rate.
Friday, October 24, 2014
Halloween Games
Halloween, a time of scaring people, parties, and all things monsters, is right around the corner. I decided I would do a little list of my favorite monster games that would be a great addition to any family party.
Smash Up:
Choose two factions to mix together in this fun card game. Use their special powers to try and out score your opponents. There is even a monster expansion for more monster goodness.


Rampage:
Use your monster to reek havoc on Meeple City. Who will capture the most meeples while flicking, throwing and blowing down a city?


King of Tokyo:
Monsters are taking over Tokyo and are fighting over who gets to be the king. Claw your way to the top in this fun family game. Just beware, you can only take so much before you need to heal or someone else will be the King of Tokyo.

Gloom:
Who can have the worst day before they die? In this card game, make your family as miserable as you can before they die while trying to cheer up your opponents family. The person with the lowest score is the winner of this game.


Castle Panic:
Can you defeat the monsters before they knock down the castle? In this co-op game, work together and try and take out the monsters before they take you out. It's a great game to play if you have younger kids since you work together.


Monsters University Dice:
Will you have the most monsters left at the end of this game? Pass them left, right, or place them in the center. Whoever has the last monster in the game wins this easy game. Fun for all ages, even my four year old understands this one.


What are some of your favorite monster games?
Smash Up:
Choose two factions to mix together in this fun card game. Use their special powers to try and out score your opponents. There is even a monster expansion for more monster goodness.
Rampage:
Use your monster to reek havoc on Meeple City. Who will capture the most meeples while flicking, throwing and blowing down a city?
King of Tokyo:
Monsters are taking over Tokyo and are fighting over who gets to be the king. Claw your way to the top in this fun family game. Just beware, you can only take so much before you need to heal or someone else will be the King of Tokyo.
Gloom:
Who can have the worst day before they die? In this card game, make your family as miserable as you can before they die while trying to cheer up your opponents family. The person with the lowest score is the winner of this game.
Castle Panic:
Can you defeat the monsters before they knock down the castle? In this co-op game, work together and try and take out the monsters before they take you out. It's a great game to play if you have younger kids since you work together.
Monsters University Dice:
Will you have the most monsters left at the end of this game? Pass them left, right, or place them in the center. Whoever has the last monster in the game wins this easy game. Fun for all ages, even my four year old understands this one.
What are some of your favorite monster games?
Wednesday, October 22, 2014
Fun AND Educational...Where Do I Sign Up?

Here is what you do to turn a fun game into an educational game:
- Decide what skill you want to practice with your child. It could be multiplication facts, sight words, vocabulary words, history facts, state capitals, geography, elements of the periodic table, etc. It can be anything your child needs to practice.
- Create flash cards of the information your child needs to learn. You could also purchase flash cards from a store if available. I've used multiplication cards and alphabet cards. I've also just made my own. For example, if your child is learning states and their capitals, make flashcards that have a state on one side and the capital city on the other.
- Choose a game (or games) your child loves.
- Play the game with your child with this twist. Before each turn, have your child answer a question on the flashcard. If your child misses a question, tell him the right answer. Keep using that question until he answers it correctly and then move on to another. If you want to be tough, your child loses a turn if the question can't be answered. I would only do this once your child is pretty comfortable with the information. Continue to play the game as usual, answering a question before each turn. If you really want to impress your kids, make sure you answer questions too! (And yes, you lose a turn when you get it wrong.)
As you can see, it is so easy to turn any fun game into an educational experience.
In the past, I've reviewed the game Bugs in the Kitchen. Click her to learn more about that game. It is a fun fast paced game all three of my kids enjoy. I've used their love of this game to my advantage as their teacher. One way I've used this is to review sight words. I made flash cards of sight words. My child had to read the sight word before she can take her turn. I love this game with the educational component because speed is important. Many kids love the added challenge of being fast.

You can also use games like Candyland, Connect 4, Memory, Go Fish, Uno, Skipbo, Slapjack and War. Really you can use any game that is simple and short. I wouldn't use a game like Mononopoly because it would just take too long with the added component. The best part of this is that you don't have to go out and buy a game for every skill your child needs to practice. (Hooray for another budget friendly way to help your kids learn!)You can use any game to practice what your child needs.
Give this a try at home and feel free to share how you turned your child's favorite game into an educational game!
Friday, October 17, 2014
Ugh! Review and Giveaway

Inside, there is a deck of cards. In the deck, there are purple, orange and green cards numbered one through five.

There is a wild in each color and one that is all three colors.

There are also Ugh! Cards.

Set up is simple. Shuffle the deck of cards and place them face down in the middle of the playing area. You are now ready to play.

On your turn, you can flip up to three cards and place them in the three Safety Piles, placing one card in each pile.

You can take any one card from the top of any one of the safety piles at any time during your turn.
If you choose not to take one of those three cards, you can press your
luck and take the top card off of the draw pile. You must keep that
card. You can also lock in your cards at any point during your turn.


If you flip and Ugh! card during your turn and it's not the first card, do what the card says and then place the Ugh! card face down in the discard pile.Ugh! cards can make you lose anywhere from one to three cards or you may lose your turn.

When you have one of each color card, you can choose to lock them in. To lock them in, simply pile them up and place them face down into your scoring pile. You don't have to lock them in as soon as you have the cards. You can try and hold out for better cards, but you may lose them. When determining the score, you will multiply the cards together. These cards are 4x3x2 so they are worth 24 points.

When placing cards into your scoring pile, offset them so they will be easier to score later on.

Wild cards can be used in one of two ways. You can use it as a card. If you lock it into a set, it is one lower than the lowest card in that set.

You can also use it to steal a card of the same color from an opponent. Here, it was used to take the green five from the opponent and then a set was locked.

Before the last card is flipped, all players can lock in a set that is in front of them. Once the last card is flipped and that player has finished their turn. The game is over. To score the game, add up each set of cards and then add them all together. Each Ugh! card in your pile is worth three points. Whoever has the highest score, wins the game!
This game is really enjoyable! It's fun, fast and lighthearted. It also helps with learning those math skills! The cards are bright and colorful. The art is amazing! This is definitely a game we will be keeping on our game shelf.
If you would like to try and win a game, enter below.
Now, for the rules:
- This giveaway is open for the US, Canada and UK only.
- Your game will be shipped directly from Calliope Games.
- The contest is open from Friday, October 17 until Thursday, October 23.
- The winner will be announced and contacted on Friday,October 24.
Wednesday, October 15, 2014
Directions: DIY Lords of Waterdeep and Expansion Storage
Since I have had some interest in how to make the storage for the Lords of Waterdeep and it's expansions, here is how we made it.
First, you will need some plastic canvas. This can be found in just about any craft store. If you get this size, it is a perfect fit for the bottom of your box. You will only need one package. This one had six pieces in it and we had some left. I also just counted squares, so it doesn't matter whether you use the metric system or the imperial system. It is the number of squares that matter.
First, you will need some plastic canvas. This can be found in just about any craft store. If you get this size, it is a perfect fit for the bottom of your box. You will only need one package. This one had six pieces in it and we had some left. I also just counted squares, so it doesn't matter whether you use the metric system or the imperial system. It is the number of squares that matter.

You will also need yarn and a yarn needle. Yarn needles have a larger eye (the hole in the needle) and are blunt on the other end. This project doesn't take much yarn and you are more than welcome to do it all in one color. We color coordinated ours, but we always have more yarn around than I would ever admit to.
If you have never sewn plastic canvas before, it is rather easy. Cut out your pieces. You are going to want to cut it in the squares next to the ones you need and then trim it up.

Lay your two pieces together. These are scraps so they don't quite line up, but all of yours should.

Thread the yarn onto your needle, and then put it through a corner, leaving a little tail.

Next, you are going to sew up the side of your seam. You will put the needle through the opposite side of where the yarn is coming from so it wraps around the edge.

Once you are done, you are going to put your needle through a few rows of the yarn.

Pull it through, and then trim it off. This will hold the yarn in place. You don't have to go all the way through the bottom, a few rows should be fine.

You can now bend your pieces how you need them to make your boxes.

Directions:
For the base, take a full sheet of the canvas. You will also need two 13x70 strips and two 13x90 strips. These are for the sides. For the dividers on the inside, you will need four 8x70 and four 8x24.
Attach them how they are in the following picture.

For the deck boxes you will need eight 17x17 for the top and bottom and twelve 17x15 for the sides. This will be enough to make the four open ended deck boxes.

For the individual player
bits, you will need twelve 7x10 for the short sides, twelve 7x19 for the
long sides and six 10x19 for the bottom.

For the game bits, you will need two 7x70 for the sides, one 8x70 for
the bottom and five 7x8 pieces for the ends and the dividers.
For the cubes, you will need two 7x10 for the sides, one 9x70 for the bottom and five 7x9 pieces for the ends and dividers.

You are now ready to put your inserts into your game box!

I hope this tutorial was easy to follow. If you have any questions, please feel free to ask and I will get back to you as soon as I can. Until then, happy crafting!
If you would like to read my review of this game, it can be found here.
Subscribe to:
Posts (Atom)